
Garlic scapes are the curly stalk that emerges from the garlic plant about a month to six weeks after the first leaves of the plant come up. The garlic scapes are harvested after they appear so that the energy of the plant is pushed into the garlic bulb, making larger garlic heads. Garlic scapes are delicious and can be eaten raw: in salads or pureed in dips, or cooked: tossed into stir fries or in any way that you would use garlic or onions. It’s also one of the first things that I preserve from my garden, usually in the form of garlic scape pesto. This year, I also did a few half pints of Dilly Scapes, where the garlic scape replaced the usual bean in the recipe. This is a total experiment, but one that is worth trying if you use small jars that you can just process in your regular pots and pans.
Garlic Scape Pesto:
I have to confess, I’m one of those who does not have a recipe for pesto. But there is a really wonderful one here on Dorie Greenspan’s blog “In the Kitchen and on the Road with Dorie.” When making garlic scape pesto to eat, I toss the garlic scapes and olive oil into the food processor, adding pine nuts, sea salt, and Parmesan cheese as we move along. The results are always delicious.

Preserving
When I’m processing for freezing, I usually leave out the cheese. I find the taste of the pesto is better, and then the pesto can also be used as seasoning. Adding the Parmesan cheese after thawing is very easy. I’ve read that many leave out the pine nuts before freezing, but I haven’t found any noticeable difference with the pine nuts frozen, so I add them in as well. After processing, I line a cookie sheet with wax paper and drop dollops of the scape pesto onto the sheet. I place this in the freezer and allow it to freeze and then toss the frozen clumps into a gallon sized garbage bag. These clumps can be tossed into homemade sauce in the winter, giving yourself a little taste of spring, or you can even cheat the seasons and bring out a clump in tomato season for a delicious heirloom tomato and garlic scape pesto salad.

Canning Dilly Scapes
Dilly beans is a huge favorite of my house. Simply beans pickled with dill, a clove of garlic, and a hot pepper, they are addiction in a jar. I’ve heard that people put them in salads and some toss them in martinis. We have been hard pressed to do anything other than scarf them down. When I heard that scapes could be used instead of the beans, it was an experiment well worth trying out!
If you’ve never canned, Dilly Scapes is a great way to start. You can use any size jar, but I’d recommend just using a small sized jar (I used half pint jars also called jelly jars). The benefit of this is you usually have a pot that is big enough to process the jars without having to take the plunge and getting a large canner. Begin all canning with cleaning your kitchen, if it’s not clean already. I mainly do this for morale. Canning can be messy and if you finish the hard work to a disastrous kitchen, you may never do it again.
Make sure that you begin with sterilized jars. I usually just toss my jars and rims in the dishwasher on hot. I put my lids in hot soapy water that I rinse and dry right before using.
The recipe of the dilly scapes (or beans) is a simple one.
Dilly Scapes
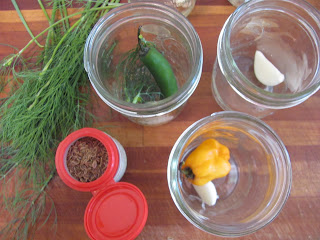
In each jar place: (see photo above of jars partially packed)
1 garlic clove
1 dill seed head (or portion of), if this is not in season, you can toss in a sprig of dill and a few dried dill seeds
1 hot pepper of your choice, the hotter the peppers, the hotter the scapes (you can also substitute hot pepper flakes)
Brine:
1 part vinegar to 1 part water, with a scant tablespoon of coarse salt for each cup of vinegar you put in. A recipe from Roy Finamore’s Tasty (a cookbook well worth owning) calls for 3 ½ cups vinegar, 3 ½ cups water, and 6 tbsp coarse salt.
Pack the scapes into each jar. I tried using the straight parts of the scape and packing them vertically and I also tried tightly packing in bite sized pieces from the curved scape. Most of the left over curves were tossed in the food processor for scape pesto. I'm honestly not sure which is the better way to go, but the straight scapes seem to use the space more efficiently.

While you are prepping the jars, set the brine to boil in one pot and begin boiling water in a different large pot for processing the jars. You’ll want to make sure the jars are covered in boiling water, so make sure the pot is big enough for that.
After the scapes are packed into the jars, ladle the hot brine into each jar, leaving ¼ inch headroom. Use a chopstick to get any excess bubbles out. When finished, wipe the outer rim of each jar with a warm wet cloth, place the lid and then screw the rim on. Carefully lower the hot jars into the boiling water. If your brine cooled, be careful because the jars can crack because of the difference in temperature.

Allow the jars to sit in the boiling water for 10 minutes. Take the jars out and then let them sit on the counter and cool. As they do, you’ll hear the

No comments:
Post a Comment